User Interface
In this guide we’ll explore the user interface of ODIN Rooms. We’ll show you how to navigate the platform and how to use the different elements that are part of the user interface.
After joining a room (see Your first Call), you will see the following user interface:
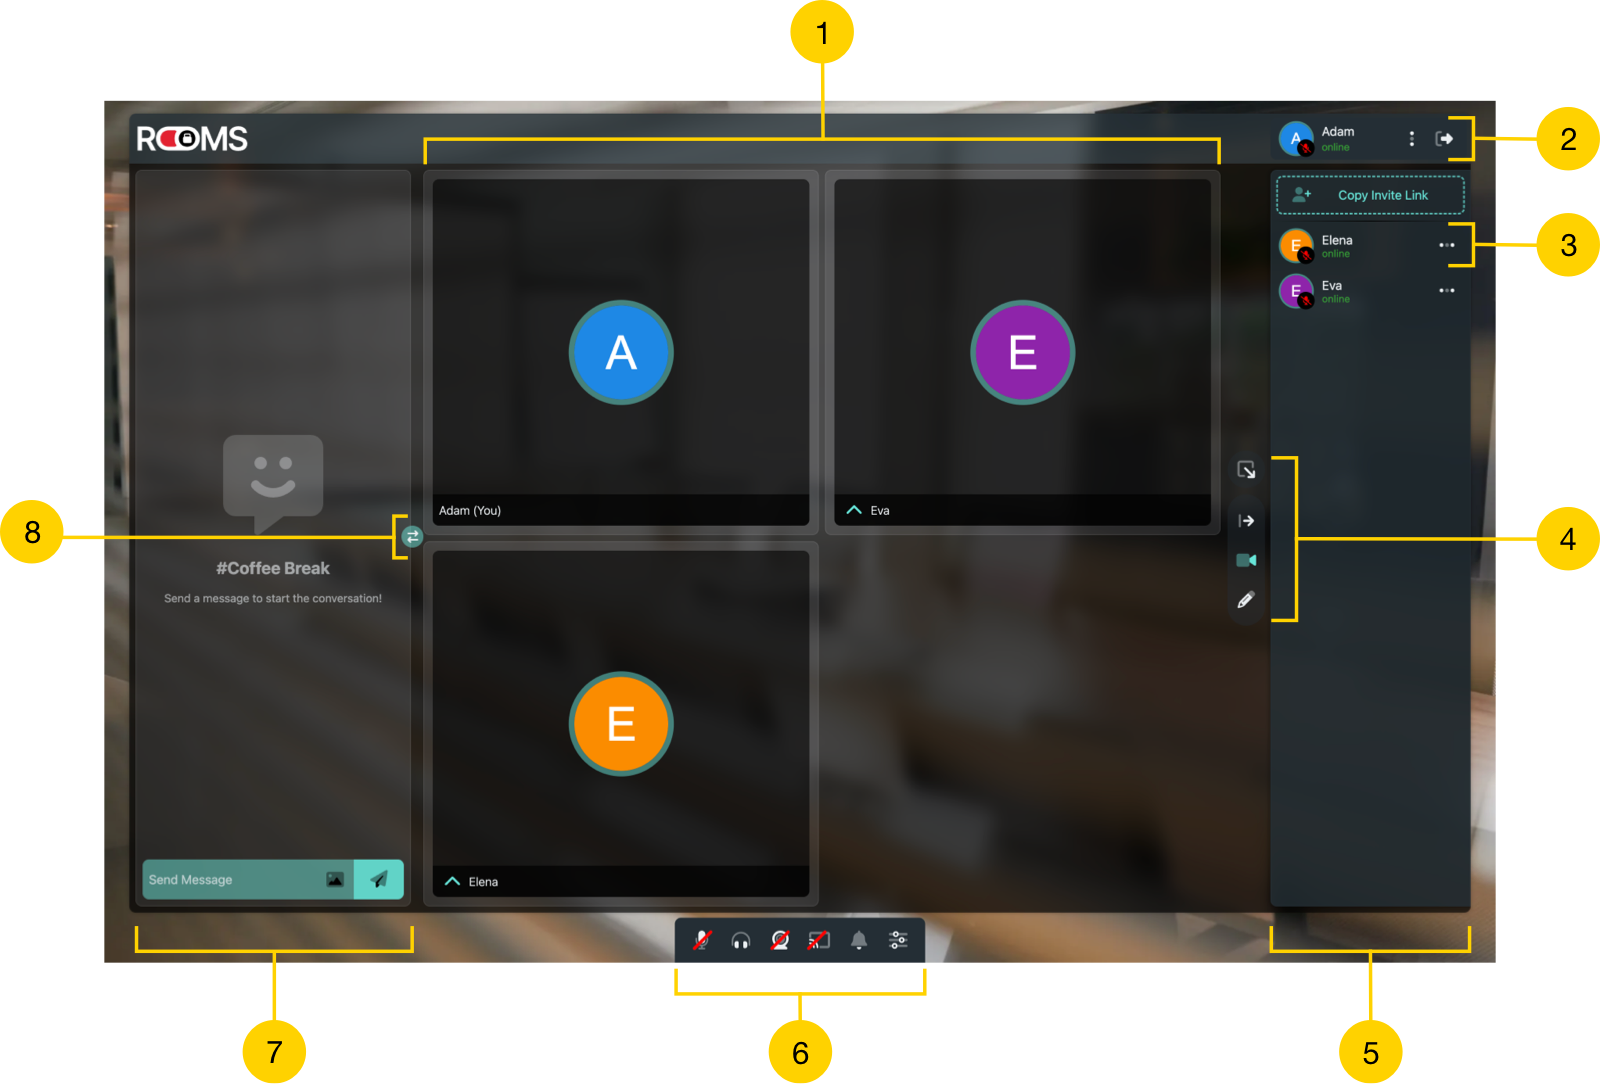
Rooms UI after joining an empty room
Let’s navigate through the UI:
- (1) Main Area
- This is the main area of the room. Here you see the video of the other participants, the chat, the whiteboard and other elements that are part of the room.
- (2) User Info
- Your user info is displayed in the top right corner including your name and your avatar. Pressing on the three dots will open a menu where you can change your name, your avatar, your status and toggle light/dark mode.
- (3) Participant
- Each user connected to the room is displayed in the participant list (5) on the right side. You can see their name, their status and their avatar. You can also see if they have audio or video enabled. By pressing on the three dots, additional options are available.
- (4) Area Controls
- These controls are used to control what is displayed in the area (see below for more details on this)
- (5) Participants
- On the sideboard on the right side you see the participants that are currently in the room. You can see their name, their status and their avatar. You can also see if they have audio or video enabled.
- (6) Dock
- The dock allows you to mute, activate or disable video, share your screen, view notifications and open the settings.
- (7) Sidebar (Left)
- The sidebar allows you to dock additional modules like the text chat. The sidebar can be opened and closed by the Area Controls (3). More on this later.
- (8) Switch
- This button switches the content of the main area with the sidebar. This way, you can have the main area for video and the sidebar for chat or whiteboard - or the other way around.
Area Controls
The area controls (3) allow you to control what is displayed in the main area. You can switch between the video, the chat, the whiteboard and other modules that are part of the room. From top to bottom, these buttons are available:
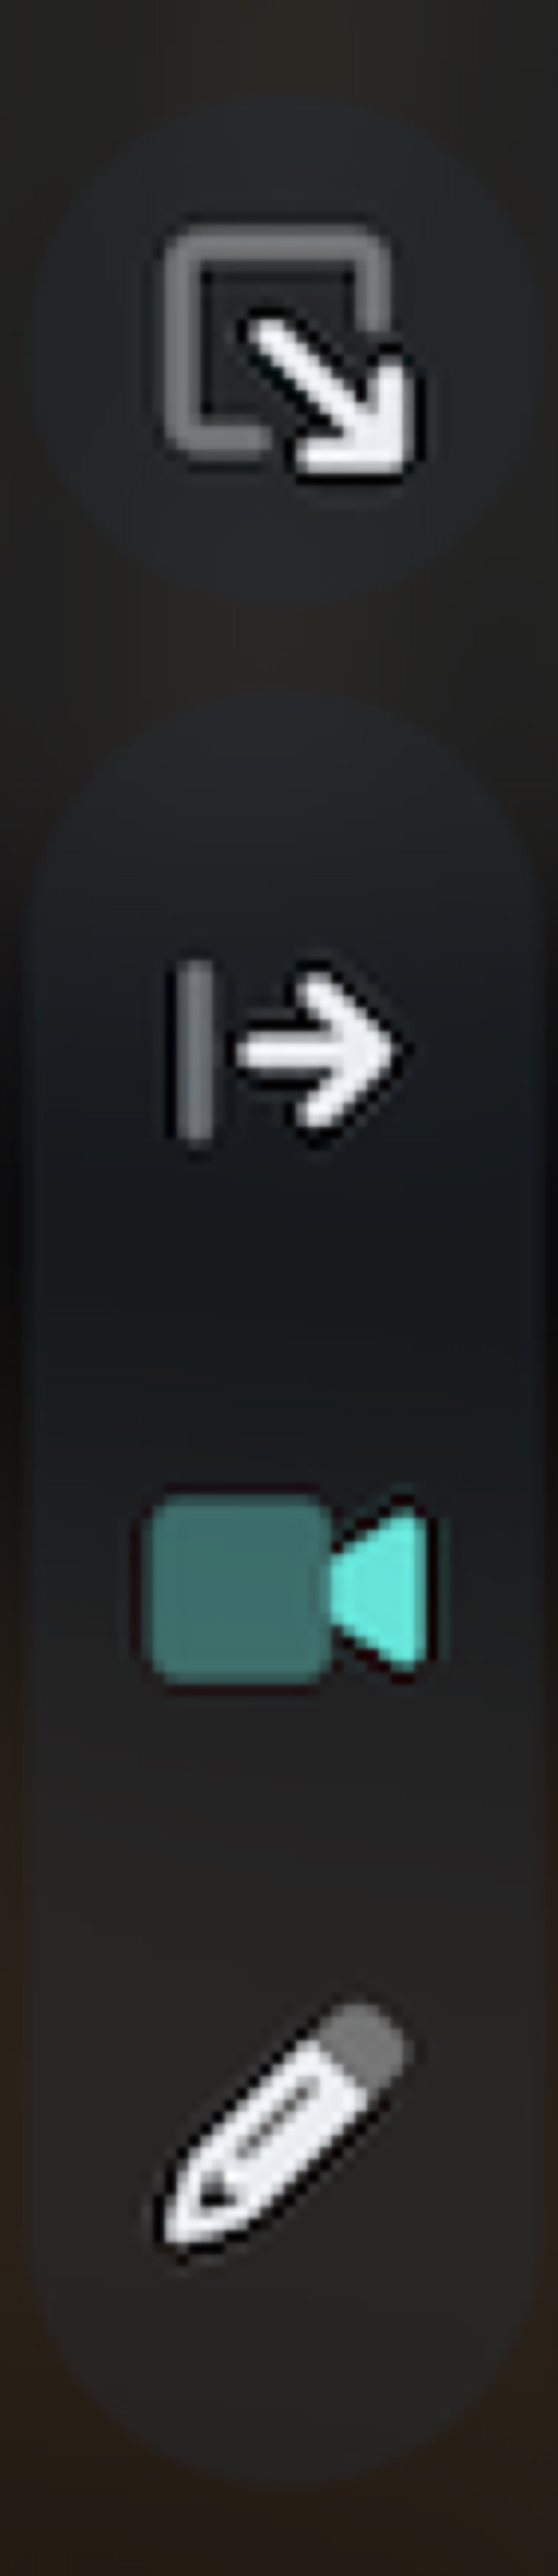
- Maximize Sidebar: The first button maximizes the sidebar. This is useful if you want to focus on the chat or the whiteboard that is typically pinned on the left side. Pressing the button again will minimize the sidebar.
- Minimize Participant List: The next button makes space for the sidebar and main area by minimizing the participant list. Instead of the full list of participants, you will only see the avatars of the participants. Pressing the button again will bring back the usual participant list.
- Video Chat/Text Chat: In the main area, show the video of the participants or the text chat. Depending on what is displayed in the sidebar (see above), you can switch between the video and the chat.
- Whiteboard: In the main area, show the whiteboard. The whiteboard is a shared canvas where you can draw, write or add images. You can use the whiteboard for brainstorming, presentations or just for fun.
Switching the Area
The typical layout is to have the text chat on the left side in the sidebar and the video in the main area. You can switch this by clicking on the “Switch” button (7). This will move the sidebar to the main area and the video to the sidebar. This is useful if you want to focus on the chat or the whiteboard.
Dock
In the dock (5) you have the following controls:

Rooms Dock
- Mute: This button mutes your microphone. If you are muted, the button has a red cross over it.
- Output: This button mutes your speakers, i.e. after clicking that button you can’t hear the other participants anymore.
- Video: This button activates or deactivates your camera. If your camera is deactivated, the button has a red cross over it.
- Screen: This button allows you to share your screen. If you are sharing your screen, the button has a green checkmark over it.
- Notifications: This button shows you the notifications that you have received. This can be a message in the chat, a poke or a notification from the system.
- Settings: This button opens the settings dialog where you can change your audio and video settings.
All app designers face the same issue: How to make it clear to the user what a button does and what the state is. One way of doing it is to show an icon that reflects what will happen if you click that button. But this requires to think about what the current state, i.e. of the microphone is. We do it differently: Buttons always reflect the current state, i.e. if the microhone button is crossed, your microphone is muted, clicking the button will activate it. If the button is not crossed, your microphone is active.
Participant List
In the participant list (5) you see the participants that are currently in the room. You can see their name, their status and their avatar. You can also see if they have audio or video enabled. By pressing on the three dots, additional options are available:
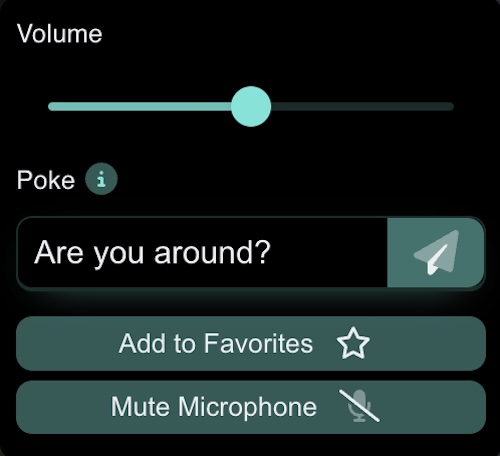
Participant Options
- Volume
- You can adjust the volume of the participant. This is useful if the participant is too loud or too quiet.
- Poke
- Sometimes you want to get the attention of a participant. You can poke them. This will send a notification to the participant.
- Add to favorites
- If you have a lot of participants in the room, you can add them to your favorites. Favorite users will be displayed at the top of the participant list and will always be visible in the video area.
- Mute Microphone
- You can mute the microphone of the participant. This is useful if the participant has a lot of background noise or if they are not aware that their microphone is active. You need to have the necessary permissions to mute other participants. See permissions for more details.
User Info
In the top right corner you see your user info. This includes your name and your avatar. Pressing on the three dots will open a menu where you can change your name, your avatar, your status and toggle light/dark mode.
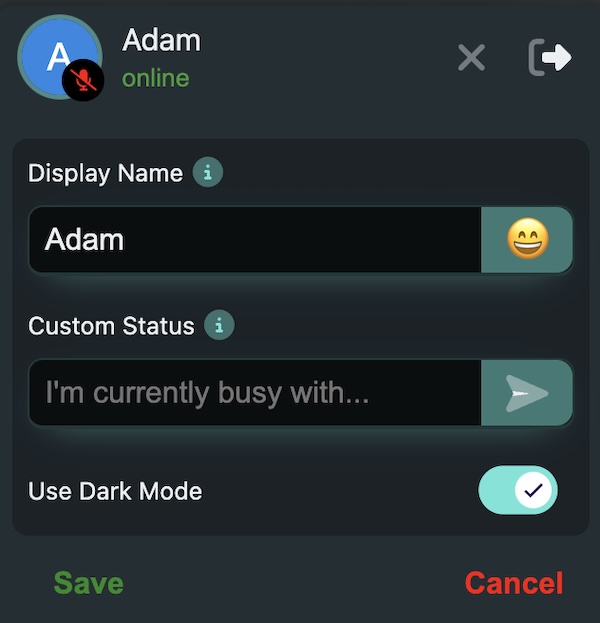
User Info
- Display Name
- You can change your display name. This is the name that is displayed to other participants in the room.
- Custom Status
- You can set a custom status. This is useful if you want to show others what you are currently doing or if you want to give them a hint on what you are interested in.
- Use Dark Mode
- You can toggle between light and dark mode. This is useful if you are in a dark environment and want to reduce the brightness of the screen.
The icon at the outermost right corner of the user info is the “Leave Room” Button. Pressing this button will leave the room and close the connection to the server. You can rejoin using the same URL or by entering the room name anytime.
Video Area
In the video module, you see the video of the participants or cards of participants with their initials. The bottom of each video cards has two buttons:
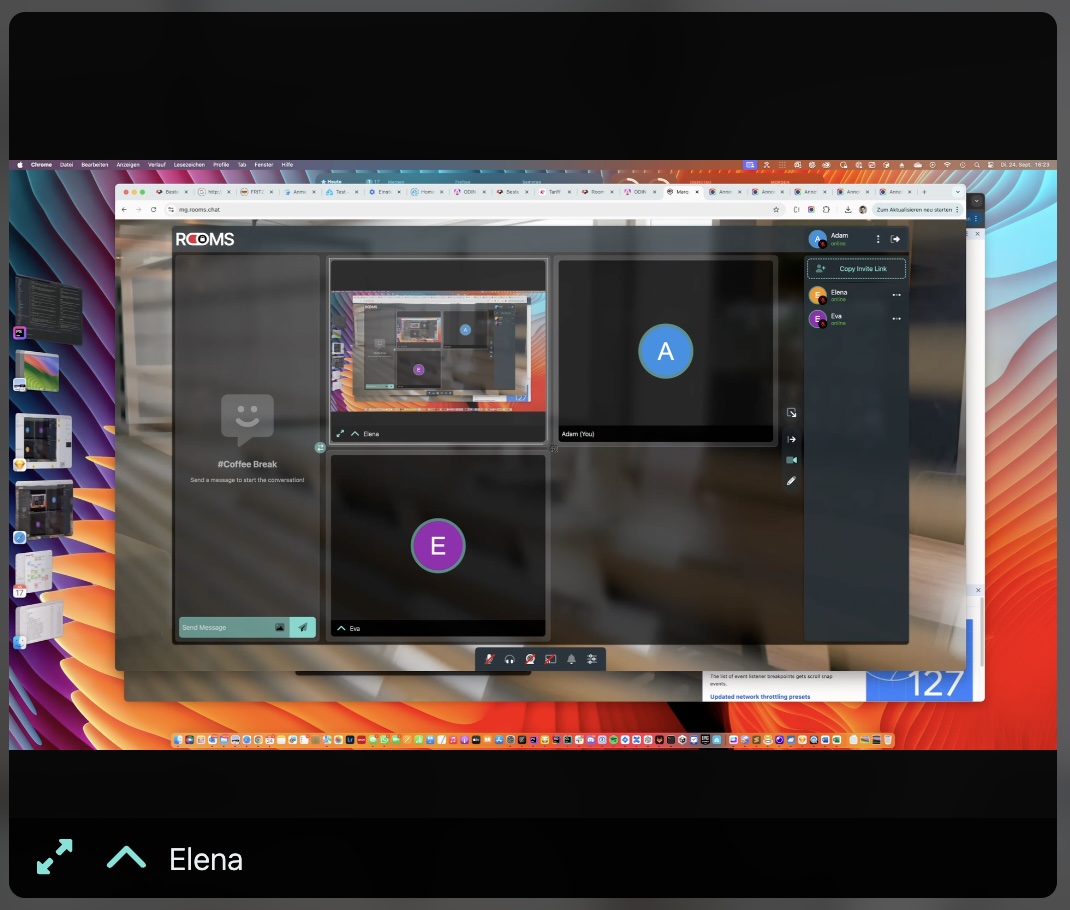
Video Area
- Fullscreen: This button allows you to switch the video to fullscreen mode. This is useful if you want to focus on the video of a specific participant (i.e. especially if they share the screen).
- Options: This button opens a menu with additional options. You can mute the participant, poke them, add them to your favorites or adjust the volume.
Please note, that the fullscreen button is only available if the participant has video enabled. It does not make sense to switch to fullscreen if the participant has no video enabled.
Clicking on the options button will open a menu with the following options:
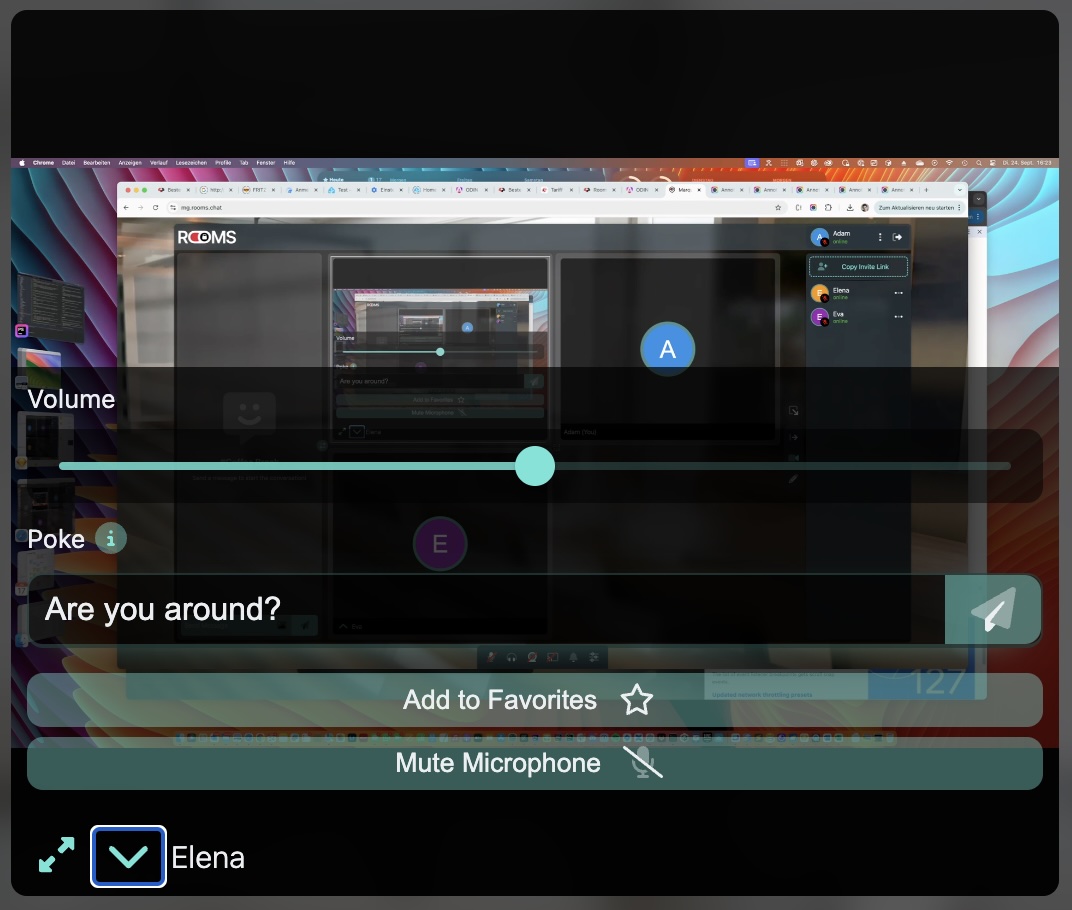
Video Area
These options are the same as in the right side participant list:
- Volume
- You can adjust the volume of the participant. This is useful if the participant is too loud or too quiet.
- Poke
- Sometimes you want to get the attention of a participant. You can poke them. This will send a notification to the participant.
- Add to favorites
- If you have a lot of participants in the room, you can add them to your favorites. Favorite users will be displayed at the top of the participant list and will always be visible in the video area.
- Mute Microphone
- You can mute the microphone of the participant. This is useful if the participant has a lot of background noise or if they are not aware that their microphone is active. You need to have the necessary permissions to mute other participants. See permissions for more details.
Clicking the options button again will close the options dialog for this participant.
Next Steps
You should now be familiar with the user interface of ODIN Rooms. Learn more about additional features in our manual:
- Permissions: Learn how to manage permissions in your room.
- Whiteboard: Discover how to use the whiteboard for brainstorming and presentations.
- Text-Chat: Explore the text-chat module and learn how to communicate with other